Are you a native speaker? Would you be willing to help us?
We are very appreciative of translations, proofreading or pictures/screenshots to help optimize our installation guide. Or any other advice.
Please don't hesitate to write us an email: info@scdb.info. Thanks in advance.
Mercedes installs various devices in their vehicles.
| Mercedes Becker Map Pilot | (navigation on hard drive) |
| Mercedes Comand Online | (navigation on hard drive) |
| Mercedes Garmin Map Pilot | (navigation on SD card) |
| Mercedes MBUX | (navigation on hard drive) |
That database download only works with Mercedes Comand Online and Mercedes MBUX!
Pay special attention between NTG5.1 (Comand Online) and NTG5Star1 (Garmin Map Pilot).
Identify NTG 4.5 and NTG 4.7 devices by the hidden engineering mode (mostly in vehicles from 2011-2014).
Press and hold down RED PHONE KEY and # and 1 to open the hidden engineering mode.
Go to Engineering Mode > 3. HU information > 3.1 Navi core information.
The identification "FL Ver .: BLD-NR-172" stands for NTG 4.5 device.
Speed cameras are displayed only visual (no acoustic warning) with version FL Ver .: BLD-NR-172 3.12.
Speed cameras are alerted visual and acoustic with version FL Ver.: BLD-NR-172 10.07 and higher.
The identification "FL Ver.: BLD-NTG47" stands for NTG 4.7 device.
Acoustic and visual alerts available in all devices.

NTG 5 was first introduced in the S-Class in 2013 and later used in various models until 2019.
There are three generations: NTG 5.1, NTG 5.2, and NTG 5.5.
Visually, it's difficult to determine which version of NTG 5 is installed in the vehicle. The easiest distinction is that NTG 5.1 has a keyboard, while NTG 5.2 and NTG 5.5 do not have a keyboard. Unlike the previous series, NTG 5 unfortunately does not have a hidden developer menu. However, you can obtain additional information about your vehicle based on the VIN (Vehicle Identification Number) from your vehicle's documents and a free VIN Decoder (e.g. lastvin.com, mb.vin or mbdecoder.com).
It is important to note that the "Personal POIs" function is no longer available in some NTG 5 devices. Before purchasing our speed camera database, you should verify this with our free sample file to ensure that your NTG 5 device can install speed camera data.
Speed camera installation is not available in A-Class W177 / V177 from May 2018.
Speed camera installation is not available in C-Class W205 / S205 / C205 / A205 from July 2018.
Speed camera installation is not available in E-Class W213 / S213 / C238 / A238 and G-Class W463 from May 2018.


The previous software version apilevel/ntg6_fup2/063 was buggy.

Do you have any new pictures to share with us?
We would greatly appreciate your assistance in improving our translations. If you could help us optimize our installation guide, we would be extremely grateful. Please feel free to send us an email anytime at info@scdb.info. Thank you in advance for your support.


The free sample file for UK allows you to test if POIs can be installed on your navigation device.
Install our sample file according to this installation guide.
The sample file does not cover all cameras. However, it serves as a demonstration of the installation procedure.
If you find after the installation of the sample file a SCDB category in the Personal POIs menu, you are able to install the full database.
Registration Note: The NTG model you choose doesn't affect the process. The same download file is applicable to all Comand Online and MBUX devices.
Try before purchase. Refund excluded after download started of full database.
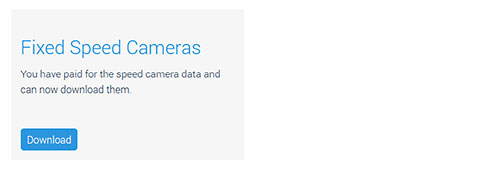
Go to our product page for Mercedes Comand Online & MBUX.
We offer only data of fixed speed cameras.
Press button Download.
Attention: Mercedes Comand Online and MBUX devices have a limit.
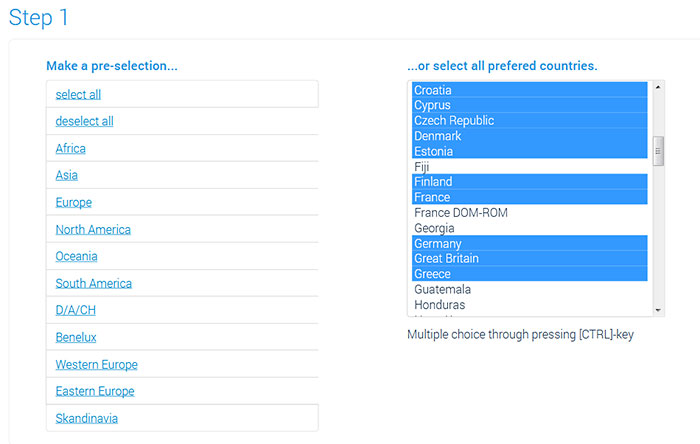
Theoretically, you can download all available countries. However, Mercedes devices can store only about 30,000 POI data. The selection "Europe" is already too large (more than 65,000 POIs). Therefore, select only the countries you really travel to. Use the statistics page for the estimation about which countries you want to choose in order to not exceed the limit.


Unzip the downloaded file mercedes-comand-online.zip.
Unzipping on a Windows computer: Right-click on the ZIP file > Extract All...
Unzipping on a Mac computer: Double-click the ZIP file.
By unzipping, you will get the file SCDB_Camera.gpx (if you followed our download recommendation).
Choose appropriate instructions for your device.
Instructions for Comand Online NTG 4.5 / 4.7
Instructions for Comand Online NTG 5.1 / 5.2 / 5.5
Instructions for MBUX NTG 6.0
Instructions for MBUX NTG 7.0
Important note:
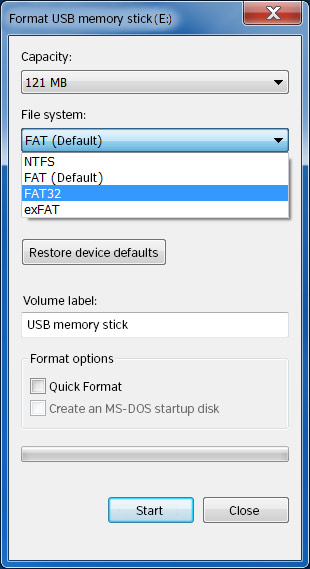
Take care of various SD card capacity standards (SD, SDHC, SDXC, SDUC) and Speed classes (original Speed Class, UHS Speed Class, Video Speed Class).
The newer the SD card, the more likely it is to not work with older devices. Newer SD cards often have higher storage capacity and may use a different file format or technology that is not supported by older devices. In such cases, the SD card may not be compatible with older devices and may not function properly. It is important to check the compatibility between the SD card and the device before purchasing a new card, especially if you are using an older device. For more information, you can visit the following link: Wikipedia article on SD cards.
We recommend using small SD cards (1-4 GB) as they are sufficient for speedcam data installation.


Go to menu Navi > Personal POI > Manage PersonalPOI categories > New.
Create a new category and call it "SCDB" or "Speedcam".
This creates a folder called PersonalPOI on the SD card.
Remove the SD card from the device.
Connect the SD card to the computer.

Remove the SD card from the computer.
Turn on the ignition.
Wait a few minutes. The data from SD card will be loaded in the background.
This process may take up to 10 minutes; depending on how many POIs are installed. Stay patient.
We need your help.
Could you send us some more pictures? We would be very grateful if you could help us further improve this manual. Please send us an email to info@scdb.info. Thank you in advance.

Reboot the device.

Important notes:
There are various types of SD cards available. One distinguishes between SD cards and SDHC/SDXC cards. SD cards usually have a size of max. 2GB. SDHC/SDXC cards are available from 4GB upwards. Some devices can only read SD cards. Try various large and small SD cards in case of any doubt or issues. The theme of SD cards is quite complex, as there are different SD standards and speed classes. Not all devices are compatible with all card variants. Read more about SD cards on Wikipedia: SD card.

Ensuring that the folder is named correctly with the spelling "PersonalPOI"!

Remove the SD card from the computer.
Insert the SD card to Comand Online device.
Turn on the ignition.
Wait a few minutes until the data from the SD card has been loaded in the background. The contents of the SD card will be automatically read.
This process may take up to 10 minutes, depending on how many POIs are being installed. Please be patient.
We need your help.
Can you send us the images in your language? We would greatly appreciate it if you could help us improve this guide further. Please send us an email at info@scdb.info. Thank you in advance.

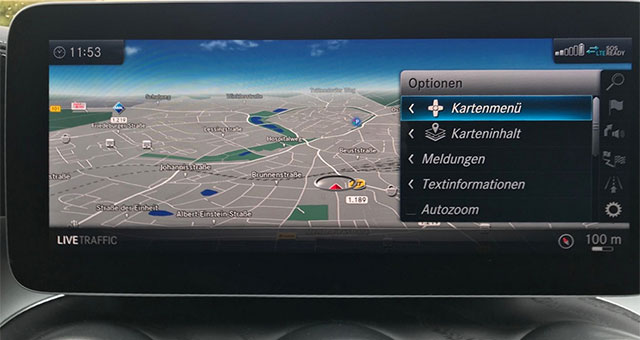
In the navigation menu, go to Options (Gear icon) > Personal POIs.
Note: If this menu item "Personal POIs" is grayed out, save the current vehicle position as a POI on the SD card.
In some cases, the SD card was recognized by the navigation system only after doing this.


In the submenu Show on Map, check the box for the category SCDB_Camera.
In the submenu Alert when approaching, check the boxes for Acoustic, Visual, and the category SCDB_Camera.


Reboot the Comand Online device.
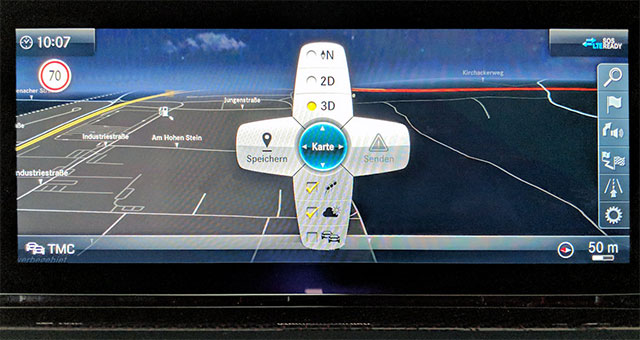
Finally, check these settings: Options (gear icon) > Map Content > POI symbols on map.


Make sure symbols are displayed.

Check the software version beforehand in the menu "Settings > System > System Information". For proper audible and visual warning of speed cameras, the software version must be apilevel/ntg6/080 or apilevel/ntg6/081.


Note regarding Mercedes Me:
Errors are often reported in connection with Mercedes Me. After restarting the vehicle, the speed cameras are no longer displayed. The reason for this is likely a fault in the device software. You can solve the problem by resetting the device to factory settings, creating a new driver profile, and not connecting this profile(!) to Mercedes Me.
Have you had similar experiences? Please feel free to send us a brief feedback. Thank you.
Connect a USB drive to the computer.

Copy the file SCDB_Camera.gpx into the directory PersonalPOI on the USB flash drive.

Remove the USB drive from the computer.
Connect the USB drive to the MBUX device.
Turn on the ignition and wait a few minutes. The system will automatically load data from the USB in the background. This might take up to 10 minutes, depending on how many data (Personal POIs) do you want to install. Be patient during this process.
Continue for software version apilevel/ntg6/081
Continue for software version apilevel/ntg6/080
Note: If the 'Personal POIs' menu remains grayed out even after a waiting time of 30 minutes, please refer to FAQ3 for further assistance.


Note: If the 'Personal POIs' menu remains grayed out even after a waiting time of 30 minutes, please refer to FAQ3 for further assistance.


The USB flash drive must remain inserted while driving. It's not possible to transfer the POIs to the internal storage.
Connect a USB flash drive to the computer.
Copy the file SCDB_Camera.gpx into the directory PersonalPOI on the USB flash drive.
Remove the USB flash drive from the computer.
Insert the USB flash drive to MBUX device.
Turn on the ignition.
Wait a few minutes. The data from USB will be loaded in the background.
This process may take up to 10 minutes; depending on how many POIs are installed. Stay patient.
Tap on the "Vehicle" button.

Then tap on the "Settings" icon.

Switch to sub-menu "Messages & tones" and tap "Personal POIs".
Note: If the "Personal POIs" menu remains grayed out, connect the USB stick to another USB port, preferably directly to the navigation unit.

Now, the available POI categories on the USB drive are displayed.
Enable the category "SCDB_Camera".

Note: If you did not follow our recommendation to download all data in one file, you may need to repeat the settings for the remaining SCDB categories as well.
Then, switch to sub-menu "View" and tap "POI symbols on map".

Select the category "SCDB_Camera".

Select Display on map" and enable the options Acoustic notification and Visual warning.

Note: If you did not follow our recommendation to download all data in one file, you may need to repeat the settings for the remaining SCDB categories as well.
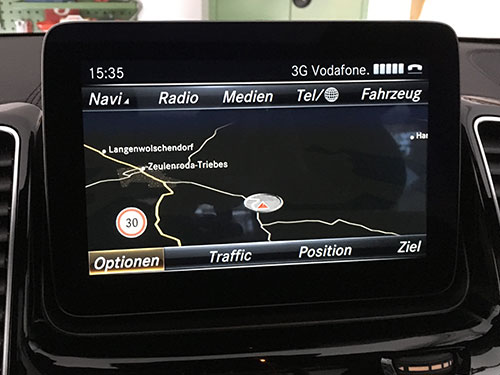
Now you can move the map on the navigation display to a known camera position. The camera positions are shown on the map at all times. The appearance of the icons may vary depending on the device type and software version.
While driving, the navigation system sounds an audible alert (a 'ding' tone warning sound) when approaching a camera.


The USB flash drive has to remain inserted while driving.
It's not possible to transfer the data into the internal storage.
The speed cameras are displayed in the map as "X" or with a camera icon (depends on software version).
The zoom level may be max. 1 to 3 km (depends on device).
Importing of own icons is impossible for all devices. Device software uses always default icon.
Audible warning can not be adjusted depending on the distance.
Speed cameras are alerted according to the method of radius search. Therefore, you can get alerts also for opposite carrieways.
Repeat all steps of the guide above to update speed cameras in your device.
Monthly updates will be recommended.
We also recommend to note the Frequently Asked Questions.
In most cases, the solution to a problem can already be found here.